

See original at http://www.utilisima.com/manualidades/5740
(Sorry. it appears the original has been removed.)
Materials needed:
Cold porcelain
Styrofoam balls #2 and #3
Toothpicks (for reinforcement)
Paints or colorants for tinting:
raw sienna, black, burgundy, olive green, blue, ochre, fleshtone and white
Modeling tools
White glue
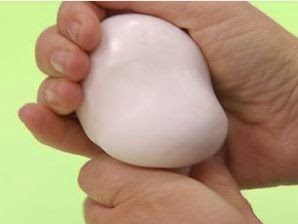
Step 1. Shape head
Step 2. Eye sockets


Step 11. Add beard and hair

Note: In following steps the author shows the hands and feet being attached to the body (sleeve and pants)....however, no steps are shown for body so far. My suggestion would be to form hands and feet and set them aside to let dry while forming body and clothing. After all is formed, assemble and attach hands, feet and head (using glue).
Step 12. Hands
Step 13. Feet
Step 14. Shape body and finish

Shape the body, legs and arms the same way as making a basic doll. Use Styrofoam ball as armature for body and use toothpicks for reinforcement when attaching arms, legs and head. When body is ready, attach hands and feet. Apply your own details and you're done!
Cover a Styrofoam ball with clay*, extending the sphere to create skull shape.
Pinch and shape clay at back of head to separate and extend a neck.
Use thumbs to indent eye sockets, leaving a gap for the bridge of nose.
Step 3. Shape nose

Push clay together to form nose and shape the bottom of nose with thumbs.
Use modeling tool with a curved edge to finish defining shape of the nose.
Mark cheeks and eye sockets further, raising his eyebrows.
Use the same modeling tool to mark the curve of the mouth.
Step 4. Shape cheeks
With the tip of the thumb, apply pressure on sides to lift clay for both cheeks.
Step 5. Shape mouth
Mark a curve with modeling tool to form mouth and lower lip.
Step 6. Nose

Continue modeling nose until you have a long nose. Fold the tip down.
Use modeling tool to form the nostrils in base of the nose.
Step 7. Eyes

Use modeling tool to roll a circular hollow area for placing the eyes.
Step 8. Eyeballs

Model two small balls of white clay for eyes.
Place 2 circles of clay on each eyeball. Use 2 sizes and 2 different colors.
One for the iris and one for the pupil.
Step 9. Insert Eyes
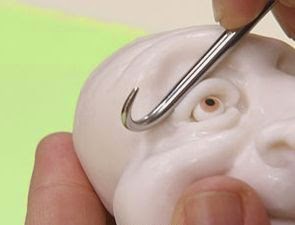
Glue eyes into the hole made in Step 7. Form the eyelids with modeling tool.
Step 10. Hat
Form clay into a small pear shape.
Shape the small end into a point and flatten the large end.
Use a tool or fingers to form flat end into concave depression that will fit head.
Form folds and wrinkles in the hat and give movement to the tip.
Glue hat to head.
Model portions of white dough into rolls for hair strands.
Attach to head below the mouth and across chin to ears.
For hair, repeat steps for beard and attach to head above ears.(see finished photo)
Add crescent of clay for eyebrows.
Note: In following steps the author shows the hands and feet being attached to the body (sleeve and pants)....however, no steps are shown for body so far. My suggestion would be to form hands and feet and set them aside to let dry while forming body and clothing. After all is formed, assemble and attach hands, feet and head (using glue).
Step 12. Hands
 |
For hands, start with a ball of clay, Roll and flatten, forming one end for wrist.
Use scissors to cut away a triangular wedge from clay which will separate thumb from rest of fingers.
Smooth the cut edge and roll in fingers to form thumb.
Sink in the center of the palm and form one large area for fingers.
Cut clay between fingers, separate fingers and model cut edges until smooth and round.
Accentuate the joints and mark fingernails.
(Tip: Cut a drinking straw off at angle to make a tool that will mark fingernails.)
Step 13. Feet
 |
Start with another ball of clay, shape into a roll for each foot.
Bend and shape one end into an ankle.
Cut a small triangular wedge out of the clay to separate large toe from other toes.
Shape the cut edge into large toe. Delineate the remaining toes.
Mark the joints in an exaggerated manner.
Bend and shape one end into an ankle.
Cut a small triangular wedge out of the clay to separate large toe from other toes.
Shape the cut edge into large toe. Delineate the remaining toes.
Mark the joints in an exaggerated manner.
unbelievable!!!
ReplyDeletewow
ReplyDeleteLindo lol e perfeito.
ReplyDeleteThe pictures don't show up, and the original address does not lead anywhere. I would love to make this little guy, but pictures are key :)
ReplyDeleteMy apologies! Somehow I missed the comments saying this tutorial was 'broken'. I re-built it and all should be OK now.
DeleteI have the same problem...nothing
ReplyDeleteMy apologies! Somehow I missed the comments saying this tutorial was 'broken'. I re-built it and all should be OK now.
DeleteWhere are the pictures?
ReplyDeleteMy apologies! Somehow I missed the comments saying this tutorial was 'broken'. I re-built it and all should be OK now.
Delete